Have you ever felt the urge to take pictures in a cemetery? Pictures of tombstones, monuments, mausoleums? No? Oh, maybe that was me. Anyway, if you DO ever get the urge, I’d like to offer some pointers.
While far from a “Twelve-Step Program,” there are some guidelines which you should heed:
1. Planning
Do some research (the Web is best) on the cemetery you want to visit, or search for all the cemeteries in a specific geographic area. Some websites publish photos of the grounds, the monuments, the famous (and infamous) inhabitants. If you’re looking for angel statues, that cemetery 50 miles away may only have flat-to-the-ground bronze plate markers.
2. Get permission
Most cemeteries have a “front office,” in some sort of administrative building. First ask permission to photograph the grounds, and abide by their rules. You may have to sign a waiver. You may have to pay a fee. Its even possible that photography may not be allowed (a good reason to call ahead!). By all means, follow their rules. Especially the one about closing times-that’s key. I’ve been on the wrong side of a locked gate enough times to know what it feels like to have your blood freeze!
3. Be respectful
Cemeteries are typically consecrated ground and its just not cool to be running around jumping over tombstones while a burial ceremony is in process. When photographing headstones and other monuments, compose your scene so as not to get names in the photograph. This can be construed as invasion of privacy if you attempt to publicly display and/or sell the photograph.
4. Do no harm
Do not break anything. Do not rut a muddy lawn with your car tires. Do not lean or climb on monuments. Expect not to be allowed to use a tripod (as this can disturb the plantings), so bring fast film. If you see detritus lying about, leave it alone-yes that old marble angel head might look wild on your mantle, but don’t be a thief.
5. Time of Day
From a photographic aspect, early morning and late afternoon sun provides the best shadow detail, so schedule your visit accordingly. Of course, if the sky is overcast, this doesn’t apply! If you must shoot at noon, or on an overcast day, you will not be punished. However, your images will lack punch.
 6. Sun Position
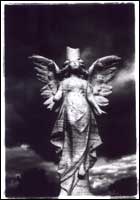
Simply put, it should be at your back, illuminating your subject. If your subject is against a dark background (e.g. the storm clouds in the image “Pillared Angel,” all the better. Contrast is your friend.
7. Composition
a. Landscape or Portrait?
Why a vertical (portrait) composition is more appealing to humans is beyond the scope of this article. Just accept that it is.
 b. Rule of Thirds
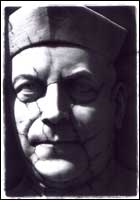
Look at the image “The Bishop.” This may appear at first to be a centered composition, but look at the hat. It occupies the top third of the frame. Why this makes the image appear more balanced will forever puzzle historians. Regardless, the Rule of Thirds quantifies for us why this composition is more aesthetically pleasing. The rule says: as you (mentally) divide the frame into thirds (as you compose the scene through your camera’s viewfinder), place your main subject at one of the dividing lines. This holds true for both vertical and horizontal compositions.
 8. Favorites
Ask the groundskeepers what their favorite monuments are. You may be led to one that is ultra cool, but you’d never have found on your own. “Child With Shroud” is such an image I made at Greenmount Cemetery in Baltimore, MD. I am very grateful to the groundskeeper who showed me this-it’s one of my best!
9. Companions
If you must bring a friend, make sure the friend is like-minded. If you’re both there to create the same art, great. Don’t bring a date–you’ll both be gravely disappointed (pun intended!).
10. Show Me the Gear!
With regard to equipment, travel light. You may be doing a lot of walking. Take extra batteries. Wear a baseball cap to shade your eyes from the sun. Carry a newspaper or magazine to use as a lens shield in case the sun is being a nuisance-this could make the difference between an almost great photograph and a great one.
For film shooters, take extra film (ISO determined by weather conditions) and an assortment of lenses. I’ve found that most detail work can be accomplished with a “normal” 50mm lens. A 135mm standard telephoto, or medium-range zoom is very handy as many monuments are on high pedestals. I don’t do much landscape work in cemeteries, so wide angles aren’t that useful to me.
For digital shooters, take extra memory cards. Bear in mind that in full sun, you’ll never see the pictorial image on your LCD. You need shade for this. Most digital point-and-shoots have a x3 optical zoom, which should be fine for cemetery work. A x10 would be marvelous (equivalent to about a 300mm standard camera lens) but you’ll need image stabilization to get decent shots.
11. Share Your Work with Others
Why keep great images buried in a shoe box or on your hard drive? If you don’t have a website, open a free (or paid) Flickr account and upload your pics!